Selasa, 14 Oktober 2025

129+ Aquasprouts Fountain Aquaponics Ecosystem Kit Charcoal 8 Gal

0

Aquasprouts fountain aquaponics ecosystem kit, charcoal, 8-gal www.pinterest.com

Introduction: Building Your DIY Aquaponics Fountain This guide will walk you through creating your own mini aquaponics system using the Aquasprouts Fountain and an 8-gallon tank. We'll transform it into a self-sustaining ecosystem, combining fishkeeping with hydroponic plant growth. Get ready to create a beautiful and functional piece for your home!
Materials You'll Need:
  • Aquasprouts Fountain Kit
  • 8-Gallon Aquarium (ensure it's clean and leak-proof)
  • Aquarium Gravel (for the tank bottom)
  • Water Conditioner (to dechlorinate your water)
  • Beneficial Bacteria Starter (to establish your nitrogen cycle)
  • Fish (appropriate for an 8-gallon tank, research beforehand consider small species like guppies or tetras)
  • Plant Seeds or Seedlings (Lettuce, herbs, or other suitable aquaponic plants)
  • Grow Media (Clay pebbles or lava rock)
  • Aquarium Heater (if needed, depending on the fish species)
  • Aquarium Filter (sponge filter is a good option)
Step 1: Setting Up the Aquarium First, rinse the aquarium gravel thoroughly to remove any dust or debris. Spread the gravel evenly across the bottom of the aquarium. Add dechlorinated water to the tank, filling it appropriately. If you're using an aquarium heater, install it now and set it to the correct temperature for your chosen fish. Install the sponge filter and connect it to an air pump. Finally, add the beneficial bacteria starter according to the instructions on the bottle. This is crucial for establishing the nitrogen cycle, which will keep your fish healthy.
Step 2: Assembling the Aquasprouts Fountain Carefully unpack the Aquasprouts Fountain kit. Follow the manufacturer's instructions to assemble the fountain structure. This usually involves connecting the growing tray to the base and attaching the pump. Ensure all connections are secure to prevent leaks.
Step 3: Connecting the Fountain to the Aquarium Place the assembled Aquasprouts Fountain on top of the aquarium. Position the pump inside the aquarium so it's fully submerged in the water. Run the tubing from the pump up to the growing tray of the fountain. Make sure the tubing is securely connected to both the pump and the tray.
Step 4: Preparing the Grow Media and Planting Rinse the clay pebbles or lava rock grow media to remove any dust. Fill the growing tray of the Aquasprouts Fountain with the rinsed grow media. If you're starting with seeds, sow them according to the seed packet instructions directly into the grow media. If you're using seedlings, gently remove them from their containers and plant them in the grow media, making sure the roots are covered.
Step 5: Starting the Water Circulation Plug in the pump to start the water circulation. The pump will draw water from the aquarium and send it up to the growing tray, where it will nourish the plants before draining back into the tank. Observe the water flow to ensure it's even and that the tray is draining properly. Adjust the pump's flow rate if necessary.
Step 6: Introducing Fish and Monitoring Before adding fish, let the aquarium cycle for at least a week. This allows the beneficial bacteria to establish and create a stable environment. After the cycling period, slowly acclimate your fish to the aquarium water by floating the bag they came in for about 15-20 minutes. Then, gradually add small amounts of aquarium water to the bag before releasing the fish. Monitor the water parameters regularly (pH, ammonia, nitrite, nitrate) to ensure the health of your fish and plants. Perform regular water changes (about 25% every week or two) to maintain water quality.
Conclusion: Enjoying Your Aquaponics Ecosystem Congratulations! You've successfully created your own Aquasprouts fountain aquaponics ecosystem. Remember to regularly monitor the water quality, feed your fish appropriately, and provide adequate light for your plants. With proper care, your system will thrive, providing you with fresh herbs and a beautiful, self-sustaining aquarium.

Aquasprouts Fountain Aquaponics Ecosystem Kit, Charcoal, 8-gal

Aquasprouts fountain aquaponics ecosystem kit, charcoal, 8-gal www.chewy.com

Aquasprouts Garden

Aquasprouts garden aquasprouts.com

Aquasprouts Fountain Aquaponics Ecosystem Kit, Charcoal, 8-gal

Aquasprouts fountain aquaponics ecosystem kit, charcoal, 8-gal www.pinterest.com

Read more

Senin, 13 Oktober 2025

148+ Aquaponics Farm Cost

0

Case studies aquaponics.com

Introduction to DIY Aquaponics Aquaponics, a symbiotic combination of aquaculture (raising fish) and hydroponics (growing plants without soil), is a sustainable method to produce food. Building your own aquaponics system can be a rewarding project, providing fresh produce and fish while minimizing environmental impact. This guide provides a step-by-step approach to constructing a small-scale, beginner-friendly aquaponics system.
Planning and Design Before you start building, careful planning is crucial. Consider the following:
  • System Type: Choose between deep water culture (DWC), nutrient film technique (NFT), or media beds. Media beds are easiest for beginners.
  • Size: Start small. A 20-gallon fish tank and a similarly sized grow bed are a good starting point.
  • Location: Select a location with adequate sunlight (6-8 hours per day) or be prepared to supplement with grow lights.
  • Materials: List all the necessary components (fish tank, grow bed, pump, plumbing, grow media, etc.).
  • Budget: Set a budget to avoid overspending.
  • A sketch of your planned system will be extremely helpful.
    Materials and Tools You'll need the following materials and tools:
  • Fish Tank: A plastic or glass aquarium.
  • Grow Bed: A plastic container of similar size to the fish tank.
  • Water Pump: A submersible pump with sufficient flow rate (check specifications for your system size).
  • Air Pump and Air Stone: To oxygenate the water for the fish.
  • Plumbing: Tubing to connect the fish tank to the grow bed and return water. Use food-grade materials.
  • Grow Media: Clay pebbles (hydroton) or gravel.
  • Bell Siphon or Timer: To automate the flood and drain cycle (bell siphon is more complex, a timer is simpler).
  • Fish: Tilapia, goldfish, or koi are popular choices (check local regulations).
  • Plants: Lettuce, herbs, and leafy greens thrive in aquaponics.
  • Tools: Drill, saw (if modifications are needed), measuring tape, level.
  • Step-by-Step Construction
  • 1. Prepare the Fish Tank: Clean the fish tank thoroughly. Ensure it is placed on a level surface.
  • 2. Prepare the Grow Bed: Clean the grow bed. If necessary, drill holes for the inlet and outlet plumbing.
  • 3. Connect the Plumbing:
  • a. Outlet from Fish Tank: Connect tubing from the water pump in the fish tank to the bottom of the grow bed.
  • b. Inlet to Fish Tank: If using a timer, place the water pump's output tubing into the bottom of the grow bed. Use the return tubing to let the water flow back into the tank. If using a bell siphon, install it now.
  • 4. Set up the Air System: Place the air stone in the fish tank and connect it to the air pump.
  • 5. Add Grow Media: Rinse the grow media thoroughly to remove dust and debris before placing it in the grow bed.
  • 6. Fill the System with Water: Fill the fish tank with dechlorinated water. You can dechlorinate tap water by letting it sit for 24-48 hours or using a dechlorinating solution.
  • 7. Cycle the System: This is crucial for establishing beneficial bacteria that convert fish waste into plant nutrients. Add an ammonia source (fish food or pure ammonia) to the tank. Monitor ammonia, nitrite, and nitrate levels daily using a test kit. The cycle is complete when ammonia and nitrite levels consistently read zero, and nitrate levels are present. This process can take several weeks.
  • 8. Add Fish: Once the system is cycled, introduce a few fish at a time to avoid shocking the system.
  • 9. Plant Seedlings: Plant seedlings in the grow bed media.
  • 10. Set up the Timer (if applicable): Set the timer to flood the grow bed for 15 minutes every hour. Adjust as needed based on plant and fish needs.
  • Monitoring and Maintenance Regular monitoring and maintenance are essential for a healthy aquaponics system:
  • Water Quality: Test water pH, ammonia, nitrite, and nitrate levels regularly. Maintain a pH between 6.0 and 7.0.
  • Water Changes: Perform partial water changes (10-20%) weekly to remove excess nutrients and maintain water quality.
  • Feeding: Feed the fish appropriate amounts of food twice daily.
  • Plant Care: Monitor plants for pests or nutrient deficiencies. Provide supplemental nutrients if needed.
  • Cleanliness: Regularly clean the fish tank and grow bed to prevent algae growth and debris buildup.
  • Conclusion Building a DIY aquaponics system is a rewarding project that combines gardening and fishkeeping. By following these steps and diligently monitoring your system, you can enjoy fresh produce and fish while learning about sustainable food production. Remember to adapt the design and techniques based on your specific needs and resources. Start small, experiment, and have fun!

    Our Aquaponics Farm

    Our aquaponics farm www.amaneco.co

    Case Studies

    Case studies aquaponics.com

    Commercial Aquaponics, Aquaponics, Farm

    Commercial aquaponics, aquaponics, farm www.pinterest.com

    Read more

    Minggu, 12 Oktober 2025

    48+ Aquaponics Project Ideas

    0

    School aquaponics project ourcanadaproject.ca

    ```html
    Introduction: Your Own Aquaponics System Aquaponics is a fascinating and sustainable method of food production that combines aquaculture (raising aquatic animals) with hydroponics (growing plants without soil). This symbiotic system allows fish waste to provide nutrients for plant growth, which in turn filters the water for the fish. This post guides you through building a small, beginner-friendly aquaponics system that can be easily scaled up as you gain experience.
    Materials You'll Need
  • A fish tank (10-20 gallons is a good starting size)
  • A grow bed (should be approximately the same volume as your fish tank) a plastic storage tote works well
  • Grow media (clay pebbles, gravel, or lava rock)
  • An aquarium water pump
  • A submersible water heater (for colder climates)
  • Air pump and air stone
  • Plumbing fittings (tubing, connectors) appropriate for your pump and tank/grow bed setup
  • Fish (start with a few goldfish or guppies)
  • Seeds or seedlings (lettuce, herbs, and leafy greens are ideal for beginners)
  • pH testing kit
  • Dechlorinator (for tap water)
  • Step 1: Setting Up the Fish Tank
  • Clean the fish tank thoroughly with water only (no soap).
  • Place the fish tank in a location that receives indirect sunlight. Direct sunlight can cause algae blooms.
  • Add dechlorinated water to the tank. Follow the instructions on your dechlorinator product.
  • Install the submersible water heater (if needed) and set it to the appropriate temperature for your chosen fish.
  • Set up the air pump and air stone to provide oxygen for the fish.
  • Let the tank cycle for at least a week before adding fish. This allows beneficial bacteria to establish themselves. You can add a small amount of fish food to the tank to help kickstart the cycling process. Regularly test your water parameters (ammonia, nitrite, nitrate) during the cycling process.
  • Step 2: Preparing the Grow Bed
  • Drill drainage holes in the bottom of your grow bed. The number and size of the holes will depend on the size of your grow bed.
  • Thoroughly wash your grow media to remove any dust or debris. This is crucial to prevent clouding the water.
  • Fill the grow bed with the cleaned grow media.
  • Step 3: Connecting the System
  • Place the grow bed above the fish tank. This will allow the water to drain back into the tank via gravity.
  • Connect the water pump to the tubing that will pump water from the fish tank to the grow bed.
  • Run the tubing from the pump up to the grow bed and position it so that the water is evenly distributed over the grow media.
  • Create a drainage system from the grow bed back to the fish tank. This can be as simple as a pipe or tube that gravity-feeds the water back down. Make sure the drainage is clear and doesn't allow the grow media to escape. You can implement a siphon, bell siphon or simple overflow. For beginners a simple overflow is more easily managed.
  • Step 4: Adding Fish and Plants
  • Once the tank has cycled and you've tested the water parameters, slowly introduce your fish. Avoid overcrowding the tank.
  • Plant your seeds or seedlings in the grow media.
  • Step 5: Maintenance and Monitoring
  • Test the water pH regularly and adjust as needed. A pH of around 6.0-7.0 is ideal for most aquaponics systems.
  • Add water to the system as needed to compensate for evaporation.
  • Remove any dead leaves or debris from the grow bed.
  • Monitor the fish for signs of disease and treat accordingly.
  • Clean the fish tank periodically to remove any accumulated sediment.
  • Provide supplemental nutrients if needed, especially if you are growing nutrient-demanding plants.
  • Conclusion: Enjoy the Benefits Congratulations! You've built your own aquaponics system. By following these steps and diligently maintaining your system, you can enjoy fresh, homegrown produce and healthy fish. Remember to research best practices for the specific plants and fish you choose to grow. Aquaponics is a rewarding hobby that promotes sustainability and provides a unique learning experience. Don't be afraid to experiment and adapt your system to meet your specific needs and goals.
    ```

    Science Project: Aquaponics By Teach Simple

    Science project: aquaponics by teach simple teachsimple.com

    Science Project: Aquaponics By Teach Simple

    Science project: aquaponics by teach simple teachsimple.com

    School Aquaponics Project

    School aquaponics project ourcanadaproject.ca

    Read more

    Sabtu, 11 Oktober 2025

    148+ Aquaponics Farming Diagram

    0

    15 diy aquaponic plans you can build in your garden www.agrifarming.in

    ```html
    Introduction: Aquaponics Your DIY Ecosystem Aquaponics, a fusion of aquaculture (raising fish) and hydroponics (growing plants without soil), offers a sustainable and efficient way to produce both food and fertilizer. This guide provides a simple, step-by-step approach to building a small-scale DIY aquaponics system, perfect for beginners.
    Step 1: Planning & Design Before diving in, consider the size, location, and plants/fish you intend to grow. A small system is easier to manage initially. Consider a system that combines a fish tank, a grow bed, and a pump for water cycling.
    Step 2: Gathering Materials You'll need the following:
  • A fish tank (approx. 20-50 gallons, food-grade plastic or glass)
  • A grow bed (should be food-grade plastic and hold water and grow media)
  • Grow media (clay pebbles, gravel, or lava rock are suitable)
  • Submersible water pump (rated for your tank and grow bed size)
  • Air pump and air stone (for oxygenating the fish tank)
  • Plumbing (tubing, fittings, and connectors to link the tank and grow bed)
  • Siphon (bell siphon or auto-siphon optional but helpful for timed draining)
  • pH testing kit
  • Starter plants and fish (choose compatible species see note below)
  • Step 3: Setting Up the Fish Tank Place the fish tank in a location that receives partial sunlight (direct sunlight can overheat the water). Add dechlorinated water to the tank. Install the air pump and air stone, ensuring the stone sits at the bottom of the tank.
    Step 4: Constructing the Grow Bed Position the grow bed above the fish tank, allowing for gravity to return the water. Line the grow bed with a pond liner if it is not already waterproof. Fill the grow bed with your chosen grow media.
    Step 5: Plumbing and Water Circulation Connect the water pump to the fish tank. Run tubing from the pump to the grow bed, positioning the outlet to evenly distribute water across the media. Implement a drain system that returns water from the grow bed back to the fish tank (this can be gravity-fed or use a siphon). If using a siphon, install it in the grow bed's drain. Test the pump to ensure proper water flow and drainage.
    Step 6: Cycling the System Before adding fish and plants, "cycle" the system. This process establishes beneficial bacteria that convert fish waste into nutrients for the plants. Add a small amount of ammonia to the fish tank (pure ammonia, available at hardware stores). Monitor the ammonia, nitrite, and nitrate levels using your pH testing kit daily. The cycle is complete when ammonia and nitrite levels reach zero and nitrate levels are present. This can take several weeks.
    Step 7: Adding Fish and Plants Once the system is cycled, slowly introduce your fish. Start with a small number and monitor their health. Add your starter plants to the grow bed, carefully burying their roots in the grow media. Leafy greens like lettuce, spinach, and herbs thrive in aquaponic systems. Avoid overcrowding the tank or grow bed.
    Step 8: Monitoring and Maintenance Regularly test the water pH and adjust as needed. A pH of around 6.0-7.0 is ideal. Replenish water lost through evaporation. Remove any dead leaves or debris from the system. Clean the fish tank periodically to prevent algae buildup. Provide fish with appropriate food. Observe both fish and plants for signs of disease or nutrient deficiencies.
    Conclusion: Enjoy Your Aquaponics Garden Congratulations! You've built your own DIY aquaponics system. With regular monitoring and maintenance, you can enjoy fresh produce and healthy fish, all while learning about sustainable food production. Remember that constant learning and adjustments are part of aquaponics.
    ```

    Aquaponics System With Fish, Plants, And Vegetables Growing In A Greenhouse Setting Stock Image

    Aquaponics system with fish, plants, and vegetables growing in a greenhouse setting stock image www.dreamstime.com

    15 Diy Aquaponic Plans You Can Build In Your Garden

    15 diy aquaponic plans you can build in your garden www.agrifarming.in

    Vertical Vegetable Aquaponics

    Vertical vegetable aquaponics www.plantsonwalls.com

    Read more

    Jumat, 10 Oktober 2025

    149+ Ornamental Plants For Aquaponics

    0

    Beneficios de las plantas ornamentales ornamentalis.com

    Introduction: Building Your Own Aquaponics System Aquaponics, the combination of aquaculture (raising fish) and hydroponics (growing plants without soil), is a sustainable and efficient method for food production. This guide provides a step-by-step process for building a small-scale DIY aquaponics system suitable for home use. This setup will demonstrate the core principles of aquaponics and allow you to grow fresh produce and raise fish simultaneously.
    Materials You'll Need Before you begin, gather the necessary materials. The quantity will depend on the size of the system you wish to build.
  • A fish tank (approximately 20-50 gallons)
  • A grow bed (plastic container larger than the fish tank)
  • Grow media (clay pebbles, lava rock, or gravel)
  • A submersible water pump
  • Tubing (to connect the fish tank to the grow bed)
  • Air pump and air stone (for oxygenating the fish tank)
  • Bell siphon components (optional, for flood and drain systems)
  • Plumbing fittings (connectors, elbows, etc.)
  • Water testing kit (for pH, ammonia, nitrites, and nitrates)
  • Fish (goldfish or tilapia are good starting options)
  • Seeds or seedlings (lettuce, herbs, and leafy greens work well)
  • Step 1: Setting Up the Fish Tank Begin by placing the fish tank in a stable location with access to electricity. Ensure the surface is level. Fill the tank with dechlorinated water. Dechlorinating the water removes harmful chemicals that can harm the fish. Install the air pump and air stone to provide oxygen to the water. Allow the tank to cycle for a few weeks to establish a beneficial bacteria colony.
    Step 2: Constructing the Grow Bed Position the grow bed above the fish tank. This allows gravity to return the water to the tank. Ensure the grow bed is sturdy and can hold the weight of the grow media and water. Drill a hole in the bottom of the grow bed for the drain. If using a bell siphon system, install the bell siphon components according to the manufacturer's instructions.
    Step 3: Connecting the Pump and Tubing Place the submersible water pump in the fish tank. Attach tubing to the pump's outlet and run it to the grow bed. Secure the tubing to prevent leaks. The pump will transport water from the fish tank to the grow bed. Position the drain tubing from the grow bed back into the fish tank, creating a closed-loop system.
    Step 4: Adding Grow Media and Plants Rinse the grow media thoroughly to remove any dust or debris. Fill the grow bed with the rinsed media. Plant your seeds or seedlings in the grow media. Space the plants according to their mature size. The grow media provides support for the plants and a surface area for beneficial bacteria to colonize.
    Step 5: Cycling the System Before adding fish, cycle the system to establish the nitrogen cycle. This involves introducing a source of ammonia (fish food or pure ammonia) to the tank and monitoring the water parameters. Beneficial bacteria will convert the ammonia into nitrites and then into nitrates, which are less harmful to fish and can be used by plants as nutrients. This process can take several weeks. Use the water testing kit to monitor ammonia, nitrite, and nitrate levels.
    Step 6: Introducing Fish Once the nitrogen cycle is established (ammonia and nitrite levels are zero), gradually introduce the fish to the tank. Start with a small number of fish to avoid overloading the system. Feed the fish a high-quality fish food. Monitor the fish for signs of stress or disease.
    Step 7: Monitoring and Maintenance Regularly monitor the water parameters (pH, ammonia, nitrites, nitrates) and adjust as needed. Maintain the water level in the fish tank and grow bed. Remove any dead leaves or debris from the system. Periodically clean the fish tank and grow bed to prevent the buildup of algae or sediment.
    Conclusion: Enjoying Your Aquaponics System Congratulations on building your own aquaponics system! With proper care and maintenance, you can enjoy fresh produce and healthy fish while contributing to a more sustainable food production system. Continuously learn and experiment to optimize your system for maximum yield and efficiency.

    Top 21 Ornamental Plants To Grow In Your Garden

    Top 21 ornamental plants to grow in your garden florgeous.com

    Beneficios De Las Plantas Ornamentales

    Beneficios de las plantas ornamentales ornamentalis.com

    Top 21 Ornamental Plants To Grow In Your Garden

    Top 21 ornamental plants to grow in your garden florgeous.com

    Read more

    Kamis, 09 Oktober 2025

    134+ Aquaponics Etymology

    0

    What are aquaponics? www.greenlife.co.ke

    Aquaponics DIY: A Step-by-Step Guide to Building Your Own System Welcome! This guide will walk you through building a simple aquaponics system, combining aquaculture (raising aquatic animals) and hydroponics (growing plants without soil). This system is relatively easy to set up and maintain, making it a great starting point for beginners.
    Materials You'll Need Before you start, gather the following materials:
  • A fish tank (approximately 20-50 gallons is a good size for beginners)
  • A grow bed (a container slightly smaller than the fish tank's footprint, but at least 8-12 inches deep)
  • Grow media (clay pebbles, lava rock, or similar inert material)
  • A submersible water pump (rated for the size of your tank and grow bed)
  • Plumbing (tubing to connect the pump to the grow bed and a drain system back to the tank)
  • Air pump and air stone (to oxygenate the water for the fish)
  • Fish (start with a small number of hardy fish like goldfish or tilapia, depending on your local regulations and climate)
  • Seeds or seedlings (leafy greens like lettuce, spinach, and herbs are good choices for beginners)
  • Water testing kit (to monitor pH, ammonia, nitrites, and nitrates)
  • Step 1: Setting Up the Fish Tank Place your fish tank in a location that receives indirect sunlight. Direct sunlight can cause algae blooms and stress the fish. Fill the tank with dechlorinated water. Add the air stone and air pump to provide oxygen for the fish. Let the tank cycle for a few weeks to establish a beneficial bacteria colony. This involves introducing a small amount of ammonia (fish food works) and monitoring the water parameters until ammonia and nitrite levels drop to zero, and nitrate levels rise.
    Step 2: Building the Grow Bed Position the grow bed above the fish tank. You can use a sturdy stand or create a DIY support system. Ensure the grow bed is stable and level. Fill the grow bed with your chosen grow media. Rinse the media thoroughly to remove any dust or debris.
    Step 3: Connecting the Plumbing Place the submersible water pump in the fish tank. Connect the tubing from the pump outlet to the bottom of the grow bed. This will pump water from the tank to the grow bed. Create a drain system to return water from the grow bed back to the fish tank. This can be a simple overflow drain or a more complex system with a bell siphon to create a flood and drain cycle. Ensure the drain is positioned so that the water level in the grow bed doesn't completely empty.
    Step 4: Planting Your Seeds or Seedlings Once the water parameters are stable (ammonia and nitrites at zero, nitrates present), you can introduce your fish. Wait a few days for them to adjust to their new environment. Plant your seeds or seedlings in the grow media. Provide adequate lighting, either natural or artificial, depending on the plants you choose.
    Step 5: Monitoring and Maintenance Regularly monitor the water parameters using your water testing kit. Adjust the pH as needed (ideally between 6.0 and 7.0). Add water to the tank as it evaporates. Clean the fish tank and grow bed periodically to remove any debris. Feed your fish regularly with high-quality fish food. Harvest your plants as they mature.
    Conclusion Congratulations! You've built your own aquaponics system. With regular monitoring and maintenance, you can enjoy fresh, healthy vegetables and a thriving aquatic ecosystem. Remember to research and adjust your system as needed to optimize its performance. Good luck!

    Aquaponics System: Everything You Ever Wanted To Know

    Aquaponics system: everything you ever wanted to know agrierp.com

    What Are Aquaponics?

    What are aquaponics? www.greenlife.co.ke

    Vertical Vegetable Aquaponics

    Vertical vegetable aquaponics www.plantsonwalls.com

    Read more

    Rabu, 08 Oktober 2025

    45+ Aquaponics Farming Images

    0

    Component of aquaponics systems 
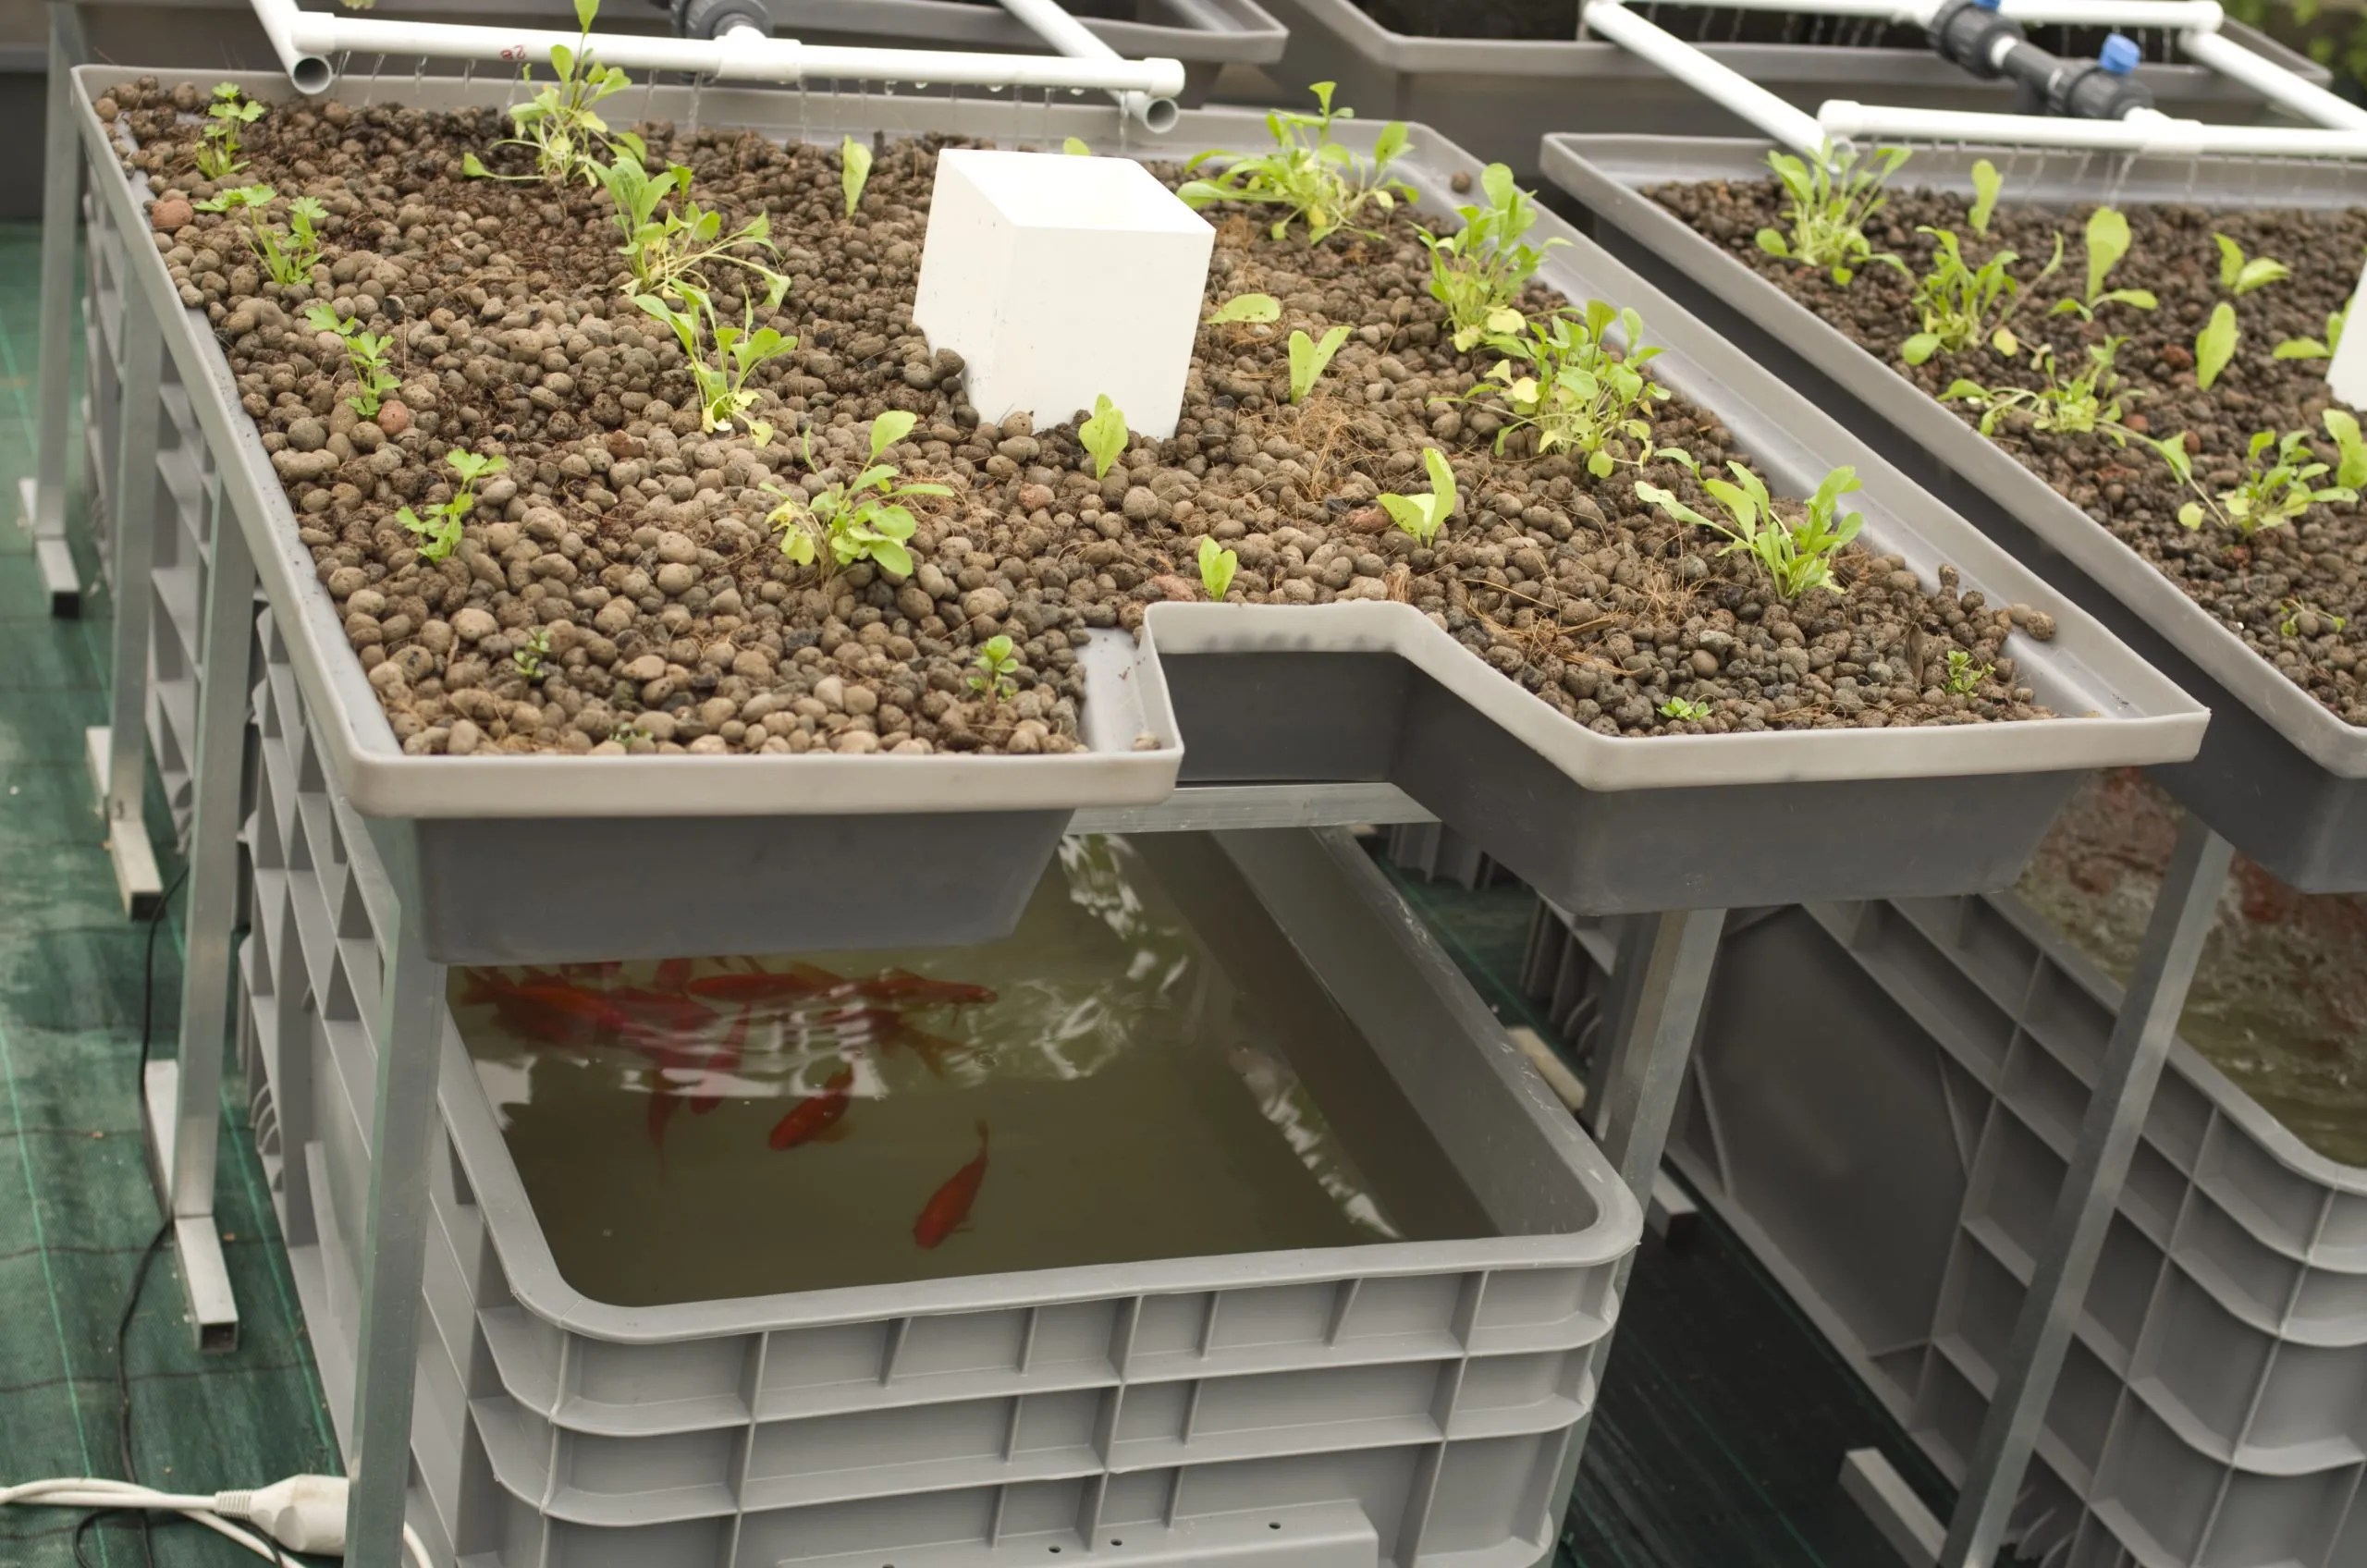
www.aquaponicsforbeginners.com

    ```html
    Introduction to DIY Aquaponics Aquaponics is a fascinating method of growing food that combines aquaculture (raising fish) and hydroponics (growing plants without soil). This symbiotic system offers a sustainable and efficient way to produce both fresh vegetables and fish. If you're looking to reduce your environmental impact, grow your own food, or simply try a rewarding new hobby, building your own DIY aquaponics system can be an excellent choice. This guide will walk you through the process step-by-step, ensuring you have a functional and productive aquaponic setup.
    Materials You'll Need Before we begin, gather the necessary materials. The specific sizes will depend on the scale of your project, but this list provides a general overview:
  • Fish Tank: A food-grade plastic container or glass aquarium. Consider starting with a 20-gallon tank or larger.
  • Grow Bed: A container to hold your growing medium. A plastic storage tote works well. Should be slightly smaller than the fish tank.
  • Grow Medium: Clay pebbles, gravel, or lava rock.
  • Water Pump: Submersible pump with enough power to circulate water from the fish tank to the grow bed. Check the flow rate (gallons per hour or GPH).
  • Plumbing: Tubing and fittings to connect the pump to the grow bed and allow water to drain back to the fish tank.
  • Air Pump and Air Stone: To oxygenate the water for the fish.
  • Bell Siphon (Optional): For a flood and drain system. You can also use a timer to control the pump.
  • Fish: Start with a small number of fish that are suitable for aquaponics, such as tilapia, goldfish, or koi (depending on your climate and regulations).
  • Seeds or Seedlings: Choose plants that thrive in aquaponic systems, such as leafy greens (lettuce, spinach, kale), herbs (basil, mint), and some fruiting vegetables (tomatoes, peppers).
  • pH Testing Kit: To monitor the pH of the water.
  • Dechlorinator: To remove chlorine from tap water.
  • Step-by-Step Construction Guide Follow these steps to assemble your DIY aquaponics system:
  • Step 1: Preparing the Fish Tank: Clean the fish tank thoroughly with water. Do not use soap or chemicals. Place the tank in a location that receives indirect sunlight.
  • Step 2: Setting Up the Grow Bed: Place the grow bed above the fish tank. You can use a stand or sturdy supports to elevate it. Ensure it's stable and level.
  • Step 3: Connecting the Plumbing: Connect the water pump to the tubing. Place the pump in the fish tank. Run the tubing from the pump to the grow bed. This is the water supply line.
  • Step 4: Creating the Drain: Drill a hole in the bottom of the grow bed for the drain. Connect tubing to this hole that will allow water to drain back into the fish tank. If using a bell siphon, install it in the drain hole according to the siphon's instructions. If not, ensure a simple drain is in place.
  • Step 5: Adding the Grow Medium: Rinse the grow medium thoroughly to remove any dust or debris. Fill the grow bed with the rinsed medium.
  • Step 6: Setting Up the Air Pump: Place the air pump outside the fish tank and connect it to the air stone with tubing. Place the air stone in the fish tank to oxygenate the water.
  • Step 7: Filling the System with Water: Fill the fish tank with dechlorinated water. Run the system for a few days to allow the water to cycle and establish beneficial bacteria.
  • Step 8: Planting Your Seeds or Seedlings: Once the water has cycled, plant your seeds or seedlings in the grow bed.
  • Step 9: Introducing the Fish: After the plants are established and the water parameters are stable, introduce the fish to the tank. Acclimate them slowly by floating the bag they came in the tank for about 30 minutes to equalize the temperature.
  • Maintaining Your Aquaponics System Regular maintenance is crucial for the success of your aquaponics system:
  • Water Quality Monitoring: Test the pH of the water regularly. The ideal pH range for most aquaponics systems is between 6.0 and 7.0. Adjust as needed using pH up or pH down solutions.
  • Water Changes: Perform partial water changes (about 20-30%) every few weeks to remove excess nutrients and maintain water quality.
  • Feeding the Fish: Feed your fish a high-quality fish food daily. Adjust the amount based on the size and number of fish.
  • Plant Care: Monitor your plants for any signs of nutrient deficiencies or pests. Adjust nutrient levels as needed. You can add small amounts of organic fertilizer if necessary.
  • Pump Maintenance: Clean the water pump regularly to ensure it is functioning properly. Check for clogs and remove any debris.
  • Conclusion Building a DIY aquaponics system is a rewarding project that offers a sustainable way to grow your own food. By following these steps and maintaining your system properly, you can enjoy fresh vegetables and healthy fish from your own backyard. Remember to research and adapt the system to your specific needs and environment. Happy growing!
    ```

    Component Of Aquaponics Systems

    Component of aquaponics systems www.aquaponicsforbeginners.com

    Aquaponics-what Is Aquaponics And How Does It Work?

    Aquaponics-what is aquaponics and how does it work? agromoris.com

    Aquaponic Gardening Systems

    Aquaponic gardening systems fity.club

    Read more

     
    Powered by Blogger